
This guide walks through how to set up a strength of materials lab from a blank room to a functioning teaching or research space. It is written for procurement officers, lab-in-charges and HODs who have been handed a budget line and told to make it happen, usually against an NBA or AICTE inspection deadline. I have specified strength of materials lab equipment for diploma, degree and postgraduate programmes across three continents, so the sequencing here is what actually works, not the vendor brochure version. The equipment sits under our strength of materials lab category if you want to browse while you read.
Get the sequence wrong and you end up with a UTM sitting in a crate for six weeks because the foundation was not cured, or a hardness tester that fails first-year calibration because it was placed next to a lathe. The order matters more than the brand.
Equipment mentioned in this guide
Review the product information, specifications and model before requesting a quotation.
Universal Hardness Tester
The Universal Hardness Tester manufactured by Scientico India combines Brinell, Vickers, and Rockwell hardness testing methods in a single machine. The machine uses interchangeable indenters and a built-in optical measuring system for Brinell/Vickers measurements, with direct-reading digital display for Rockwell hardness.
View product details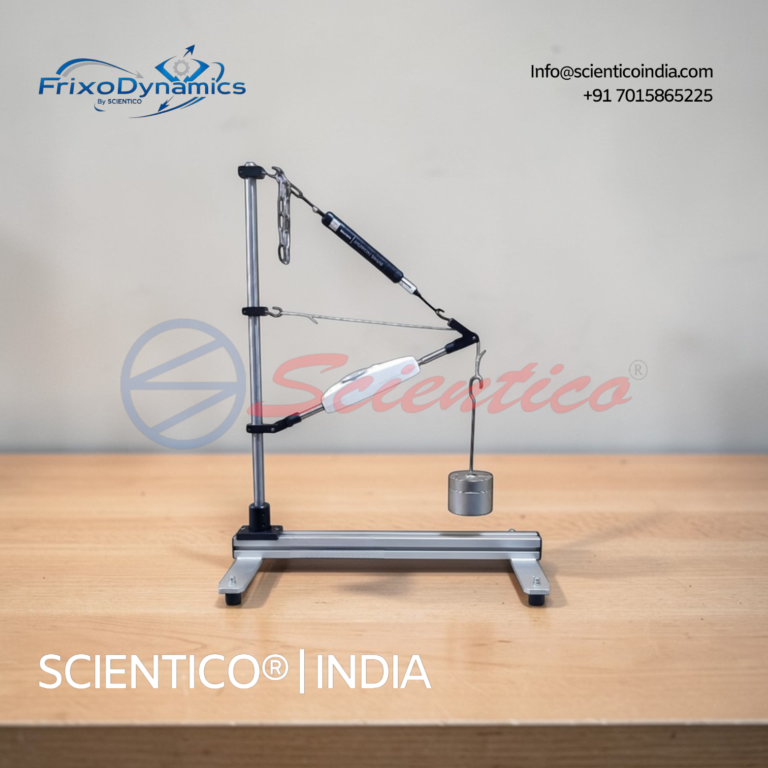
Forces in a Jib Crane Apparatus | FrixoDynamics FX-510
The SCIENTICO FrixoDynamics FX-510 Forces in a Jib Crane Apparatus is a wall-mounted experimental unit designed for the study of force distribution in a two-member jib crane structure. It enables students to measure compressive and tensile forces in the jib and tie members directly using an integrated force gauge and spring balance, and to compare those measured values against theoretical predictions derived from the triangle of forces and polygon of forces methods. The jib inclination and tie angle are adjustable, allowing a range of geometric configurations to be tested. Manufactured by SCIENTICO, the FX-510 is suitable for supply to engineering institutions and distributors worldwide.
View product detailsWhat you need before you start
Before a single quotation goes out, lock down five things. First, floor space. A workable strength of materials lab needs roughly 80 to 120 square metres for a class of 30 students working in batches of five. Second, a load-rated floor. A 400 kN or 600 kN UTM wants a reinforced concrete slab, not a first-floor room with a false ceiling below. Third, power. Most benchtop rigs run 230 V single-phase, but the UTM and any servo-hydraulic gear will want 415 V three-phase with a dedicated MCB. Fourth, the syllabus. Pull the exact experiments listed by your affiliating university, AICTE model curriculum or the DGT/TVET body if you are outside India. Fifth, the standards reference set. At minimum you want ASTM E10, E18, E92 and IS 1500 on the shelf before you specify hardness gear.
If you skip any one of these, you will re-buy something within 18 months. I have seen it happen.
Step-by-step: strength of materials lab
- Freeze the experiment list first. Write out every experiment the syllabus mandates (tension test, compression, hardness Brinell/Rockwell/Vickers, Izod, Charpy, torsion, deflection of beams, spring stiffness, fatigue if postgraduate). This list drives everything else, do not let a vendor drive it for you.
- Map experiments to equipment groups. Cluster them into anchor machines (UTM, impact tester, torsion machine, hardness tester) and bench-top rigs (beam apparatus, spring rigs, column buckling). Anchor machines are the big spend, roughly 60 to 70 percent of the budget.
- Do the civil work before the PO. Cast the UTM foundation pad, run the 415 V line, install a 2-tonne chain hoist above the UTM position, and confirm floor levelness within 2 mm per metre. Vendors will not warranty a UTM installed on an out-of-level floor.
- Specify the UTM capacity honestly. For undergraduate teaching, 400 kN handles almost every specimen a syllabus asks for. Jumping to 600 kN or 1000 kN doubles the price and is only justified if you are testing rebar or structural steel coupons for research.
- Pick your hardness testing strategy. A single universal hardness tester covering Brinell, Rockwell and Vickers is more economical than three dedicated machines for a teaching lab. For a research lab, split them, because throughput and calibration cycles are different.
- Order specimen preparation gear alongside the main machines. This is where most labs cut corners and regret it. You need a specimen cutter, a lathe or CNC turning centre for tension specimens, and a mounting press if you plan any metallographic work. Without these, students spend three sessions preparing one specimen.
- Plan calibration from day one. Every load-measuring machine needs an NABL-traceable calibration certificate at commissioning and annually thereafter. Budget it. A UTM calibration in India runs 15 to 35 thousand rupees depending on capacity.
- Design the layout for traffic flow, not for photos. Anchor machines against the walls, bench rigs on islands, specimen prep in a separate zone. Aisles of at least 1.2 metres. Emergency stops within arm’s reach of every hydraulic machine.
- Commission in the vendor’s presence. Do not sign off remotely. Run one full experiment on each machine with the vendor engineer present, and log the reading against a known reference specimen. This is your only leverage window if something is off.
- Write the SOP folder before the students arrive. One laminated SOP per machine, one master risk assessment, one calibration log. If NBA or NAAC walks in and the folder is not there, the machines might as well not be either.
Common mistakes and pitfalls
The mistakes repeat across colleges. First, buying the biggest UTM the budget allows instead of the right one. A 1000 kN machine is impressive on a plaque and useless for a plastics or composites syllabus that needs precise low-load resolution. Second, placing the hardness tester on a wooden bench or near vibration sources. Vibration destroys repeatability, and your ASTM E18 compliance goes with it.
Third, ignoring the ambient temperature spec. Hardness and precision measurement gear wants a 20 to 25 degree C room. An un-air-conditioned lab in Chennai or Lagos will drift readings by more than the standard permits. Fourth, forgetting spares. Order at least two years of consumables (indenters, jaws, grips, hydraulic oil, calibration blocks) with the main PO. Buying these piecemeal later costs two to three times more and lead times can hit 12 weeks.
Fifth, and this is the expensive one, no thought given to future accreditation. Design the lab so it can pass NBA today and ISO 17025 tomorrow. The delta is mostly documentation and calibration discipline, not equipment, but only if you set it up right the first time.
Standards and compliance
A strength of materials lab lives or dies by traceable standards. The hardness testers must comply with ASTM E10 for Brinell, ASTM E18 for Rockwell and ASTM E92 for Vickers. Indian institutions typically also reference IS 1500. The whole lab benefits from an ISO 17025 calibration discipline even if you are not formally accredited, because it forces the right paperwork habits.
On the supply side, insist on equipment carrying ISO 9001:2015 manufacturing quality and CE marking for anything electrical or pressurised. Scientico has held ISO 9001:2015 certification and CE conformity across the strength of materials range for years, which simplifies the tender paperwork if you are procuring under a government or university GeM/e-tender rail.
The Scientico angle
Scientico has been manufacturing out of Ambala since 1993, shipping to 60-plus countries, and the strength of materials line is one of the older product families in the catalogue. The universal hardness tester is the anchor product I recommend for teaching labs because one machine covers Brinell, Rockwell and Vickers, which cuts both floor space and training overhead. For force and reaction experiments that bridge into applied mechanics, the forces in a jib crane apparatus from the FrixoDynamics range gives students a concrete way to see resolved forces before they touch a UTM.
Where Scientico earns its keep on a strength of materials tender is calibration documentation and spares support. The certificates arrive with the machines, and consumables ship out of Ambala without the 12-week import wait you get from European brands. That is not a small thing when your accreditation visit is in eight weeks.
Related reading
- Universal hardness tester buyer’s guide (India)
- Brinell vs Vickers vs Rockwell hardness testers compared
- Universal testing machine price guide (India)
- Lab equipment for engineering colleges
- Lab equipment for polytechnics and TVET
If you want a specification document tailored to your syllabus, floor plan and budget, send the room dimensions and experiment list to our team via the contact page. I would rather spend 30 minutes scoping it correctly than watch another lab buy a 1000 kN UTM it will never use.
Frequently Asked Questions
How much space do I need to set up a strength of materials lab?
For a class of 30 students working in batches of five, plan for 80 to 120 square metres. The UTM alone needs about 6 square metres of clear floor plus aisle space, and the impact and torsion machines want another 4 square metres each. Add a separate zone for specimen preparation.
What is the minimum equipment list for an undergraduate strength of materials lab?
A 400 kN UTM, a universal hardness tester covering Brinell/Rockwell/Vickers, an impact tester (Izod and Charpy), a torsion testing machine, a spring stiffness rig, a beam deflection apparatus and a column buckling rig. That combination covers the standard AICTE and most international undergraduate syllabi.
Do I need a three-phase power supply?
Yes, for the UTM and any servo-hydraulic gear you want a dedicated 415 V three-phase line with its own MCB. The bench-top rigs and hardness testers run on 230 V single-phase, but do not share the UTM circuit with them.
How long does setup take from PO to first experiment?
Expect several weeks of production time at the factory, plus transit. For domestic Indian dispatch, budget 8 to 12 weeks from PO to commissioning. For export orders, add sea transit weeks and customs clearance. Civil works should be completed during the production window so the machines arrive to a ready room.
What accreditation standards apply to a strength of materials lab?
On the equipment side, insist on ISO 9001:2015 manufacturing quality and CE marking. For testing procedures, reference ASTM E10, E18 and E92 for hardness, and IS 1500 for the Indian Brinell standard. If you plan to seek NBA, NAAC or eventual ISO 17025 recognition, set up the calibration and SOP documentation from day one rather than retrofitting it later.
One honest ask
We don't gate anything on this site. You just read the whole thing free. If it was useful, leave your email and two things happen: we send you this page as a plain-text block you can paste into a tender file or an internal email, and we notify you the next time we publish a buyer tool like this one. Nothing else. No drip sequence, no sales calls booked without asking.